Hello Kitty Snood
My friend’s baby, Emma, is turning 2 in less than2 weeks!! She’s such a cutie pie ever since she was born♡♡♡ She speaks many words, runs around everywhere, and shows many different facial expression! I’m so blessed to see this baby girl growing day by day and see that closely and be there for her as auntie-figure.
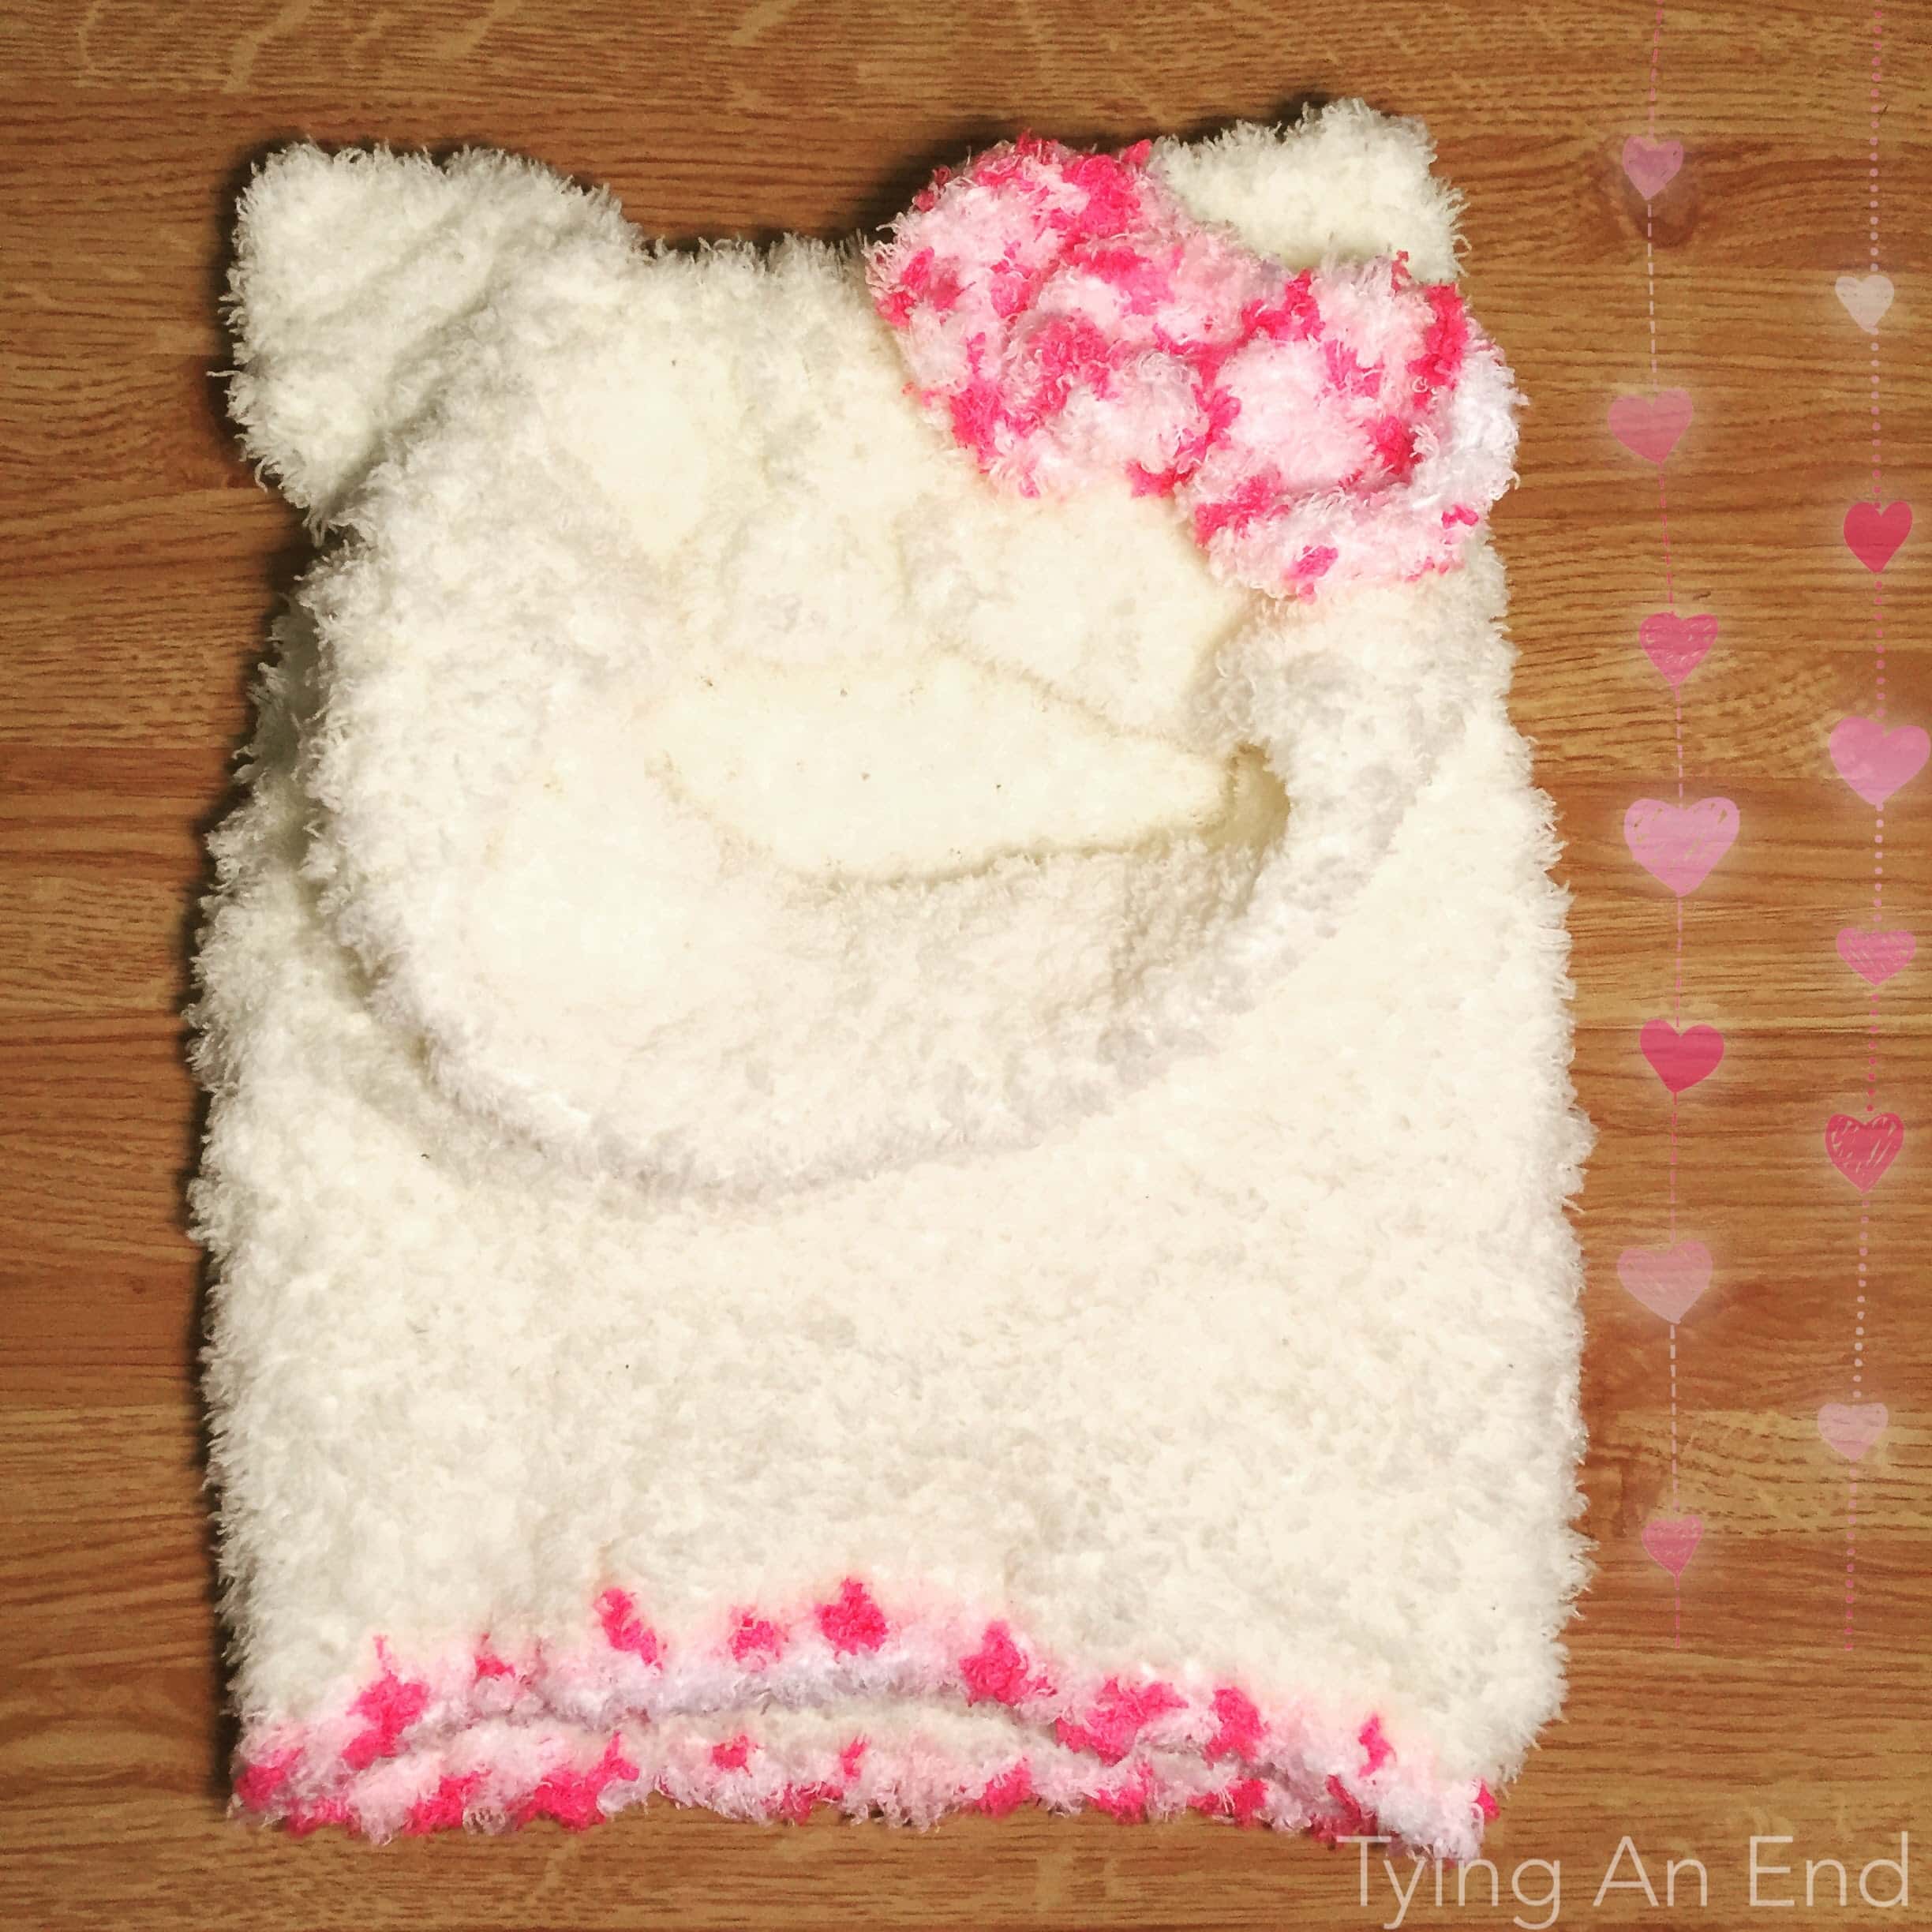
As her birthday present, I decided to make Hello Kitty snood!! She loves Hello Kitty (and Anpanman, a Japanese super hero anime). On Halloween this year, we even made Hello Kitty Jack-o-lantern for her! (You can read my blog on Halloween HERE) I wasn’t sure which one she loves the most, Hello Kitty or Anpanman…but I knew she would look so much cuter with Hello Kitty so I decided to go with Hello Kitty!
When I found Mousie Snood from Yarnspirations.com, I fell in love how adorable it was♡ I knew I had to make this for Emma and her sister Ellie. Instead of mouse, I wanted to make the snood with other animal or character. I remember she loves Hello Kitty and that’s how I ended up with this snood.
I hope everyone can enjoy making this adorable snood! Here’s free pattern for Hello Kitty’s ears and ribbon!
Materials:
- 1 skein of Bernat Pipsqueak Yarn in Vanilla
- 1 skein of Bernat Pipsqueak Yarn in Pink Swirl
- US N/10mm crochet hook
- US J/6mm crochet hook
- Stitch markers
Notes:
- Size – about 20.5in (52cm) head opening.
- Gauge: 8 SC and 10 rows = 4in (10cm)
- I used Mousie Snood from Yarnspirations.com for snood part and created my own pattern for ears and ribbon. Please click HERE to get the pattern.
- Because it is very hard to see stitches for Pipsqueak Yarn, I highly recommend you use stitch marker for 1st ST on every row and anywhere else you need to make it easier.
- Please DO NOT sell this pattern and finished product because Hello Kitty is licensed by Sanrio. It is illegal to sell their trademark character without getting their permission. Please make this ONLY for your personal use such as making for yourself and giving as a gift for someone close to you.
Abbreviations:
- CH – chain stitch
- HDC – half double crochet
- ST – stitch
- SC – single crochet
- SL ST – slip stitch
- SC2TOG – single crochet 2 together
Instructions:
*I’m only going to write how many stitches I made.
With 10mm hook and Pipsqueak in Vanilla, CH 41.Round 1 – same instruction as Mousie Snood (41STs)Round 2 – CH 2. 5 SC, 4 HDC, 23 DC, 4 DC, 5 SC.Round 3 – repeat same number as round 2.Repeat until long side measures about 14in (35cm)
I added 1 round (1 SC in each ST) with Pipsqueak Yarn as 1st round in Pink Swirl to make it pop.
– Ears –
With 6mm hook and Pipsqueak in Vanilla, leaving about 18in (45cm) long to sew ears later, CH 11.
Row 1 – 1 SC in 2nd CH from hook. 1 SC in each CH across. (10STs)
Row 2 – Turn. CH 1. SC2TOG. 1 SC each in next 6 SC. SC2TOG. (8STs)
Row 3 – Turn. CH 1. SC2TOG. 1 SC each in next 4 SC. SC2TOG. (6STs)
Row 4 – Turn. CH 1. SC2TOG. 1 SC each in next 2 SC. SC2TOG. (4STs)
Row 5 – Turn. CH 1. 2 SC2TOG. (2STs)
Row 6 – Turn. CH 1. SC2TOG. Fasten off. (1ST)
Make another one.
– Ribbon –
*You will be working in oval for main ribbon part, and in joined round for center part.
– Main Ribbon Part –
With 6mm hook and Pipsqueak in Pink Swirl, CH 10.
Round 1 – 1 HDC in 3rd CH from hook. 1 SC each in next 6 CH back loop only. 3 HDC in last CH. Turn and 1 SC each in next 6 CH of foundation CH front loop only. 2 HDC on 1st CH. Join with SL ST to 1st HDC. (18STs)
Round 2 – CH 2 (count as 1 HDC). 1 HDC in 1st HDC. 1 SC each in next 6 SC. 2 HDC each in next 3 HDC. 1 SC each in next 6 SC. 2 HDC each in next 2 HDC. Join with SL ST to 1st HDC. (24STs)
Round 3 – CH 2 (count as 1 HDC). 1 HDC in 1st HDC. 2 HDC in next HDC. 1 SC each in next 6 SC. 2 HDC each in next 6 HDC. 1 SC each in next 6 SC. 2 HDC each in next 4 HDC. Join with SL ST to 1st HDC. Fasten off. (36STs)
– Center part
With 6mm and Pipsqueak in Pink Swirl, leaving about 18in (45cm) long to sew it later, make magic ring.
Round 1 – 6 SC in ring. Join with SL ST to 1st SC. Pull the end to close the hole. (6STs)
Round 2 – CH 1. 2 SC in each SC around. (12STs)
Round 3 – CH 1. (1 SC. 2 SC in next SC)*. Repeat * 5 more times. Fasten off. (18STs)
Sew ears to the snood. I attached mine about 5th row from the face opening. Sew center part of the ribbon and main ribbon. Do not cut remaining yarn. Use that yarn to attach ribbon to snood.
Please let me know if there’s something wrong with the pattern!
Thank you for reading!

This pattern is an original pattern by Tae of Tying An End. Please do not claim this pattern as your own. If you wish to share this pattern, please link to this pattern and do not copy and paste it on to your site. You may keep a copy for your own personal use but please do not sell the pattern or distribute it. You may not sell products made from this pattern but please clearly credit the design to me, Tae of Tying An End, and provide a link to my blog tyinganend.com when you make for your personal use. Permission is not granted for mass production or factory manufacturing of any kind. Thank you for being respectful and for your understanding!
2 Comments
Pingback:
Pingback: