![[Free Crochet Pattern] Cute little leaves to guide your reading! Budding Leaf Bookmark by Tying An End](https://www.tyinganend.com/wp-content/uploads/2018/03/IMG_7135.jpg)
Budding Leaf Bookmark
Cute little leaves are sprouting out from the book! Budding Leaf Bookmark is perfect gift idea for your bookworm friends! Get the free crochet pattern below or you can purchase ad-free, printable PDF on my Etsy, Lovecrafts, or Ravelry!
Happy Spring! Next Tuesday, it marks the first day of spring. Chicago’s temperature sure doesn’t feel like spring everyday, but we are getting warm days here and there!
I think this can relate to other crochet/knit makers as well, but for me, whenever I come up with new design, I usually think of one season ahead of a time. So this project was in my mind during last winter. Oh yes, it’s been in my head for quite some time. (And I wish I have more time in my life so that I can create my own ideas as well as other beautiful projects from other makers!!!)
![[Free Crochet Pattern] Cute little leaves to guide your reading! Budding Leaf Bookmark by Tying An End](https://www.tyinganend.com/wp-content/uploads/2018/03/IMG_7137-640x427.jpg)
To get through cold weather of Chicago winter, I like to think of warm weathers coming ahead. So for this project, my inspiration was definitely the spring season. Spring is all about longer day light and new plants start budding out from the ground. I wanted to make this project as a reminder of spring that’s coming ahead. Also, I wanted to make it beginner friendly as well.
![[Free Crochet Pattern] Cute little leaves to guide your reading! Budding Leaf Bookmark by Tying An End](https://www.tyinganend.com/wp-content/uploads/2018/03/IMG_7148-640x427.jpg)
There were many trials and errors for this project, but I love the way it turned out! It’s very simple and takes very little time to make!
![[Free Crochet Pattern] Cute little leaves to guide your reading! Budding Leaf Bookmark by Tying An End](https://www.tyinganend.com/wp-content/uploads/2018/03/IMG_7139-640x427.jpg)
Isn’t it so cute how the leaves are peaking out of the book? It is self-standing leaves so it looks like it’s actually growing from the book! One of my challenge for this project was to make these leaves self-standing when put it in the book. I initially had beads but I didn’t like how the beads didn’t really translate the look of stem. It didn’t look bad when you look at it just by itself, but not in the book.
![[Free Crochet Pattern] Cute little leaves to guide your reading! Budding Leaf Bookmark by Tying An End](https://www.tyinganend.com/wp-content/uploads/2018/03/IMG_7138-640x960.jpg)
I added wooden bead at the end for touch of color and texture. I had this bead for over years; I got them when I went to summer camp back in high school. There was a time for arts and crafts and I made bracelets with this bead and hemp. I wore them everyday after I made it, and of course, it broke over many years I wore it. After it broke, I took it apart and thought I could use it for some other arts & craft project. I’m glad I kept it all these years because this looks super cute with the bookmark!
![[Free Crochet Pattern] Cute little leaves to guide your reading! Budding Leaf Bookmark by Tying An End](https://www.tyinganend.com/wp-content/uploads/2018/03/IMG_7145.jpg)
![[Free Crochet Pattern] Cute little leaves to guide your reading! Budding Leaf Bookmark by Tying An End](https://www.tyinganend.com/wp-content/uploads/2018/03/IMG_7144.jpg)
This bookmark is easily adjustable in length when making it. It fits for average novel book size (8″~10″ size book) comfortably, but if you want to make longer bookmark, that’s not a problem at all. (Please check out the photo instruction)
![[Free Crochet Pattern] Cute little leaves to guide your reading! Budding Leaf Bookmark by Tying An End](https://www.tyinganend.com/wp-content/uploads/2018/03/IMG_7140.jpg)
I hope you enjoy this project as much as I do! Here’s the free pattern for Budding Leaf Bookmark! (You can purchase nicely formatted PDF at my Etsy shop HERE, Lovecrochet HERE, and Ravelry HERE !)
MATERIALS:
- Lily Sugar n’ Cream Original [1 ball = 120yd/109m, 2.5oz/71g, category 4 medium – worsted weight]
- 1 ball of any color (photo shown “Hot Green”)
- US 7/4.5mm crochet hook
- Tapestry needle
- Tape measure
- Stitch marker (optional)
- Bead (optional)
PATTERN NOTES:
- Size – about 13” (33cm) long; leaves – about 3.5” (9cm) wide
- You will be working around CH
- ” (type of a stitch) #” means to make an indicated stitch into the next indicated number of stitches.
- Example: if pattern calls out for “HDC 4”, make 1 HDC in next 4 stitches
- ” #(type of a stitch)” means to make an indicated number of stitches into the same stitch.
- Example: if pattern calls out for “3SC”, make 3 SC into the same stitch
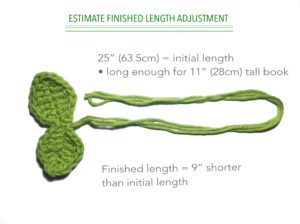
- For Step 5, if you prefer to make a bookmark shorter/longer, pull up a loop shorter/longer. (See photos on Step 5 for estimate/suggestion length)
ABBREVIATIONS (US TERMS):
- CH – chain stitch
- SC – single crochet
- HDC – half double crochet
- DC – double crochet
- TR – treble crochet
- SL ST – slip stitch
- YOH – yarn over hook
INSTRUCTIONS:
Step 1 – CH 15. Fasten off.
Step 2 – SL ST in 7th CH. HDC in same (7th) CH. (DC. TR 2. DC. HDC. [SC. CH 1. SC.] in last CH. HDC. DC. TR 2. DC. HDC. SL ST in same stitch you just worked HDC in)*. SL ST in next (8th) CH.
![[Free Crochet Pattern] Cute little leaves to guide your reading! Budding Leaf Bookmark by Tying An End](https://www.tyinganend.com/wp-content/uploads/2018/03/IMG_7015.jpg)
![[Free Crochet Pattern] Cute little leaves to guide your reading! Budding Leaf Bookmark by Tying An End](https://www.tyinganend.com/wp-content/uploads/2018/03/IMG_7029.jpg)
![[Free Crochet Pattern] Cute little leaves to guide your reading! Budding Leaf Bookmark by Tying An End](https://www.tyinganend.com/wp-content/uploads/2018/03/IMG_7034.jpg)
![[Free Crochet Pattern] Cute little leaves to guide your reading! Budding Leaf Bookmark by Tying An End](https://www.tyinganend.com/wp-content/uploads/2018/03/IMG_7031.jpg)
![[Free Crochet Pattern] Cute little leaves to guide your reading! Budding Leaf Bookmark by Tying An End](https://www.tyinganend.com/wp-content/uploads/2018/03/IMG_7032.jpg)
![[Free Crochet Pattern] Cute little leaves to guide your reading! Budding Leaf Bookmark by Tying An End](https://www.tyinganend.com/wp-content/uploads/2018/03/IMG_7033.jpg)
![[Free Crochet Pattern] Cute little leaves to guide your reading! Budding Leaf Bookmark by Tying An End](https://www.tyinganend.com/wp-content/uploads/2018/03/IMG_7039.jpg)
![[Free Crochet Pattern] Cute little leaves to guide your reading! Budding Leaf Bookmark by Tying An End](https://www.tyinganend.com/wp-content/uploads/2018/03/IMG_7040.jpg)
![[Free Crochet Pattern] Cute little leaves to guide your reading! Budding Leaf Bookmark by Tying An End](https://www.tyinganend.com/wp-content/uploads/2018/03/IMG_7041.jpg)
![[Free Crochet Pattern] Cute little leaves to guide your reading! Budding Leaf Bookmark by Tying An End](https://www.tyinganend.com/wp-content/uploads/2018/03/IMG_7042.jpg)
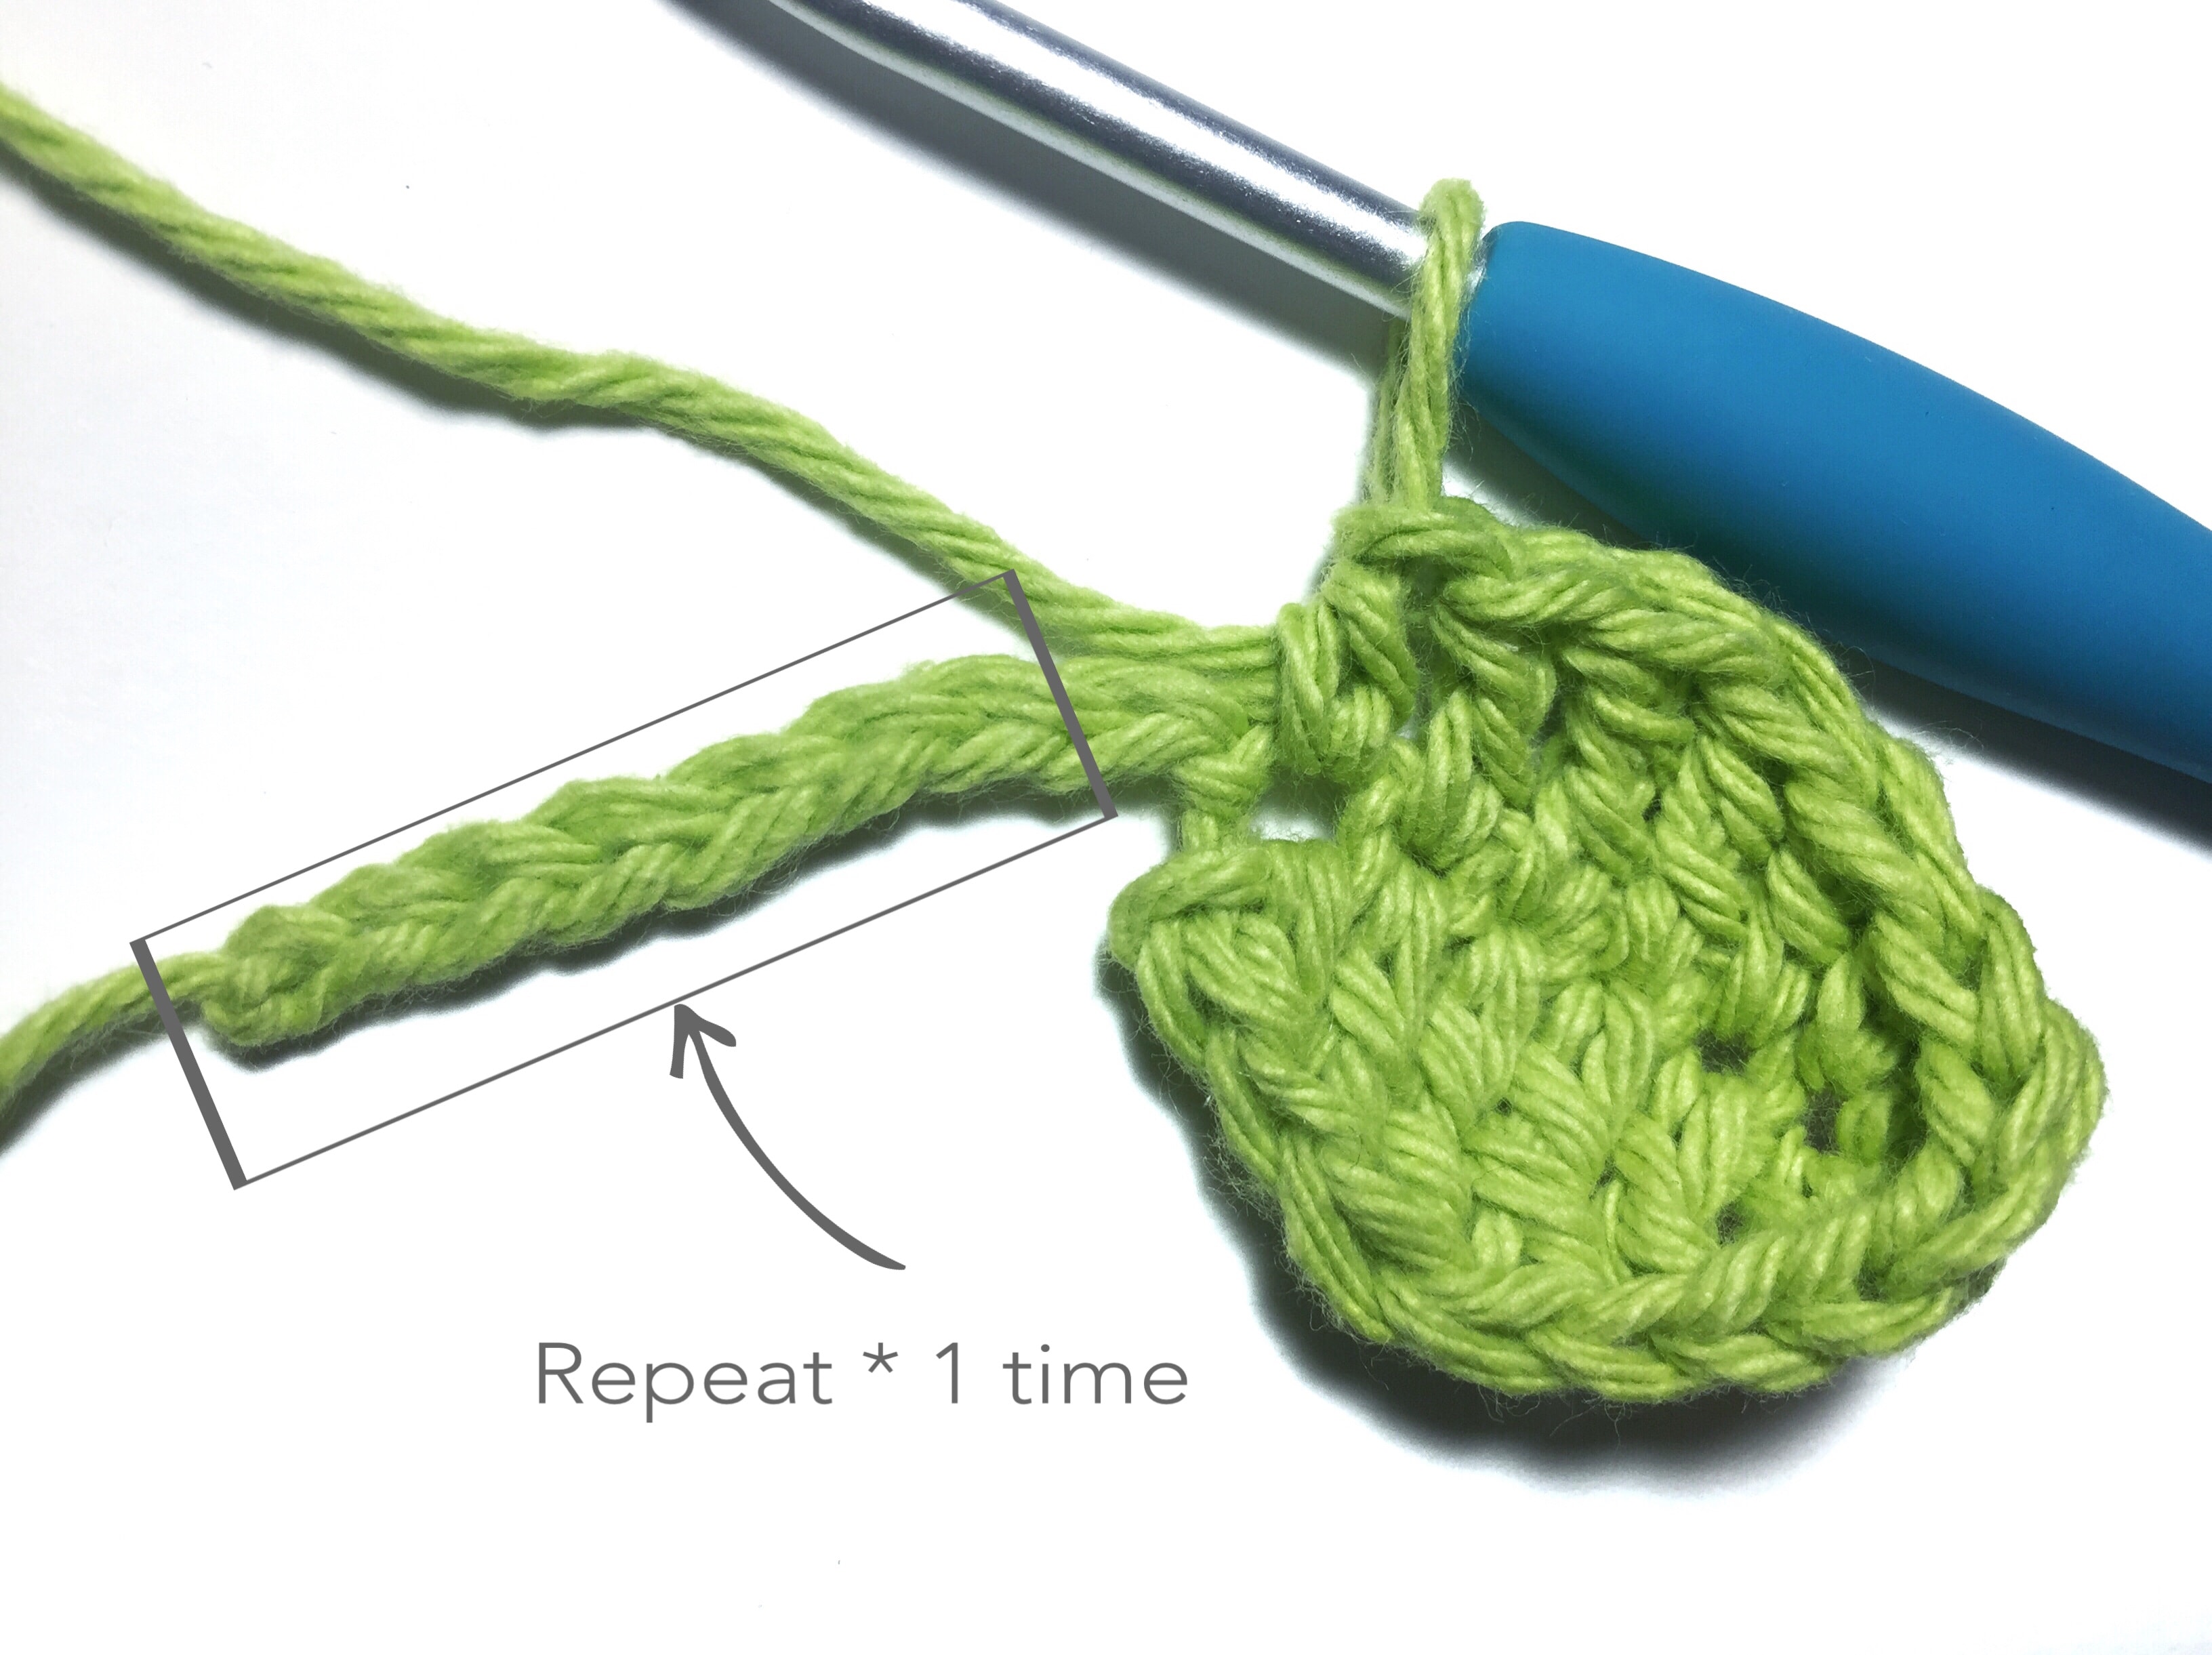
Step 3 – HDC in next CH. Repeat * 1 time.
![[Free Crochet Pattern] Cute little leaves to guide your reading! Budding Leaf Bookmark by Tying An End](https://www.tyinganend.com/wp-content/uploads/2018/03/img_7059.jpg)
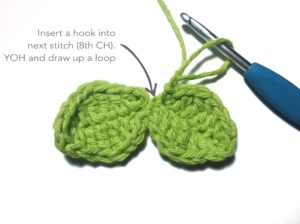
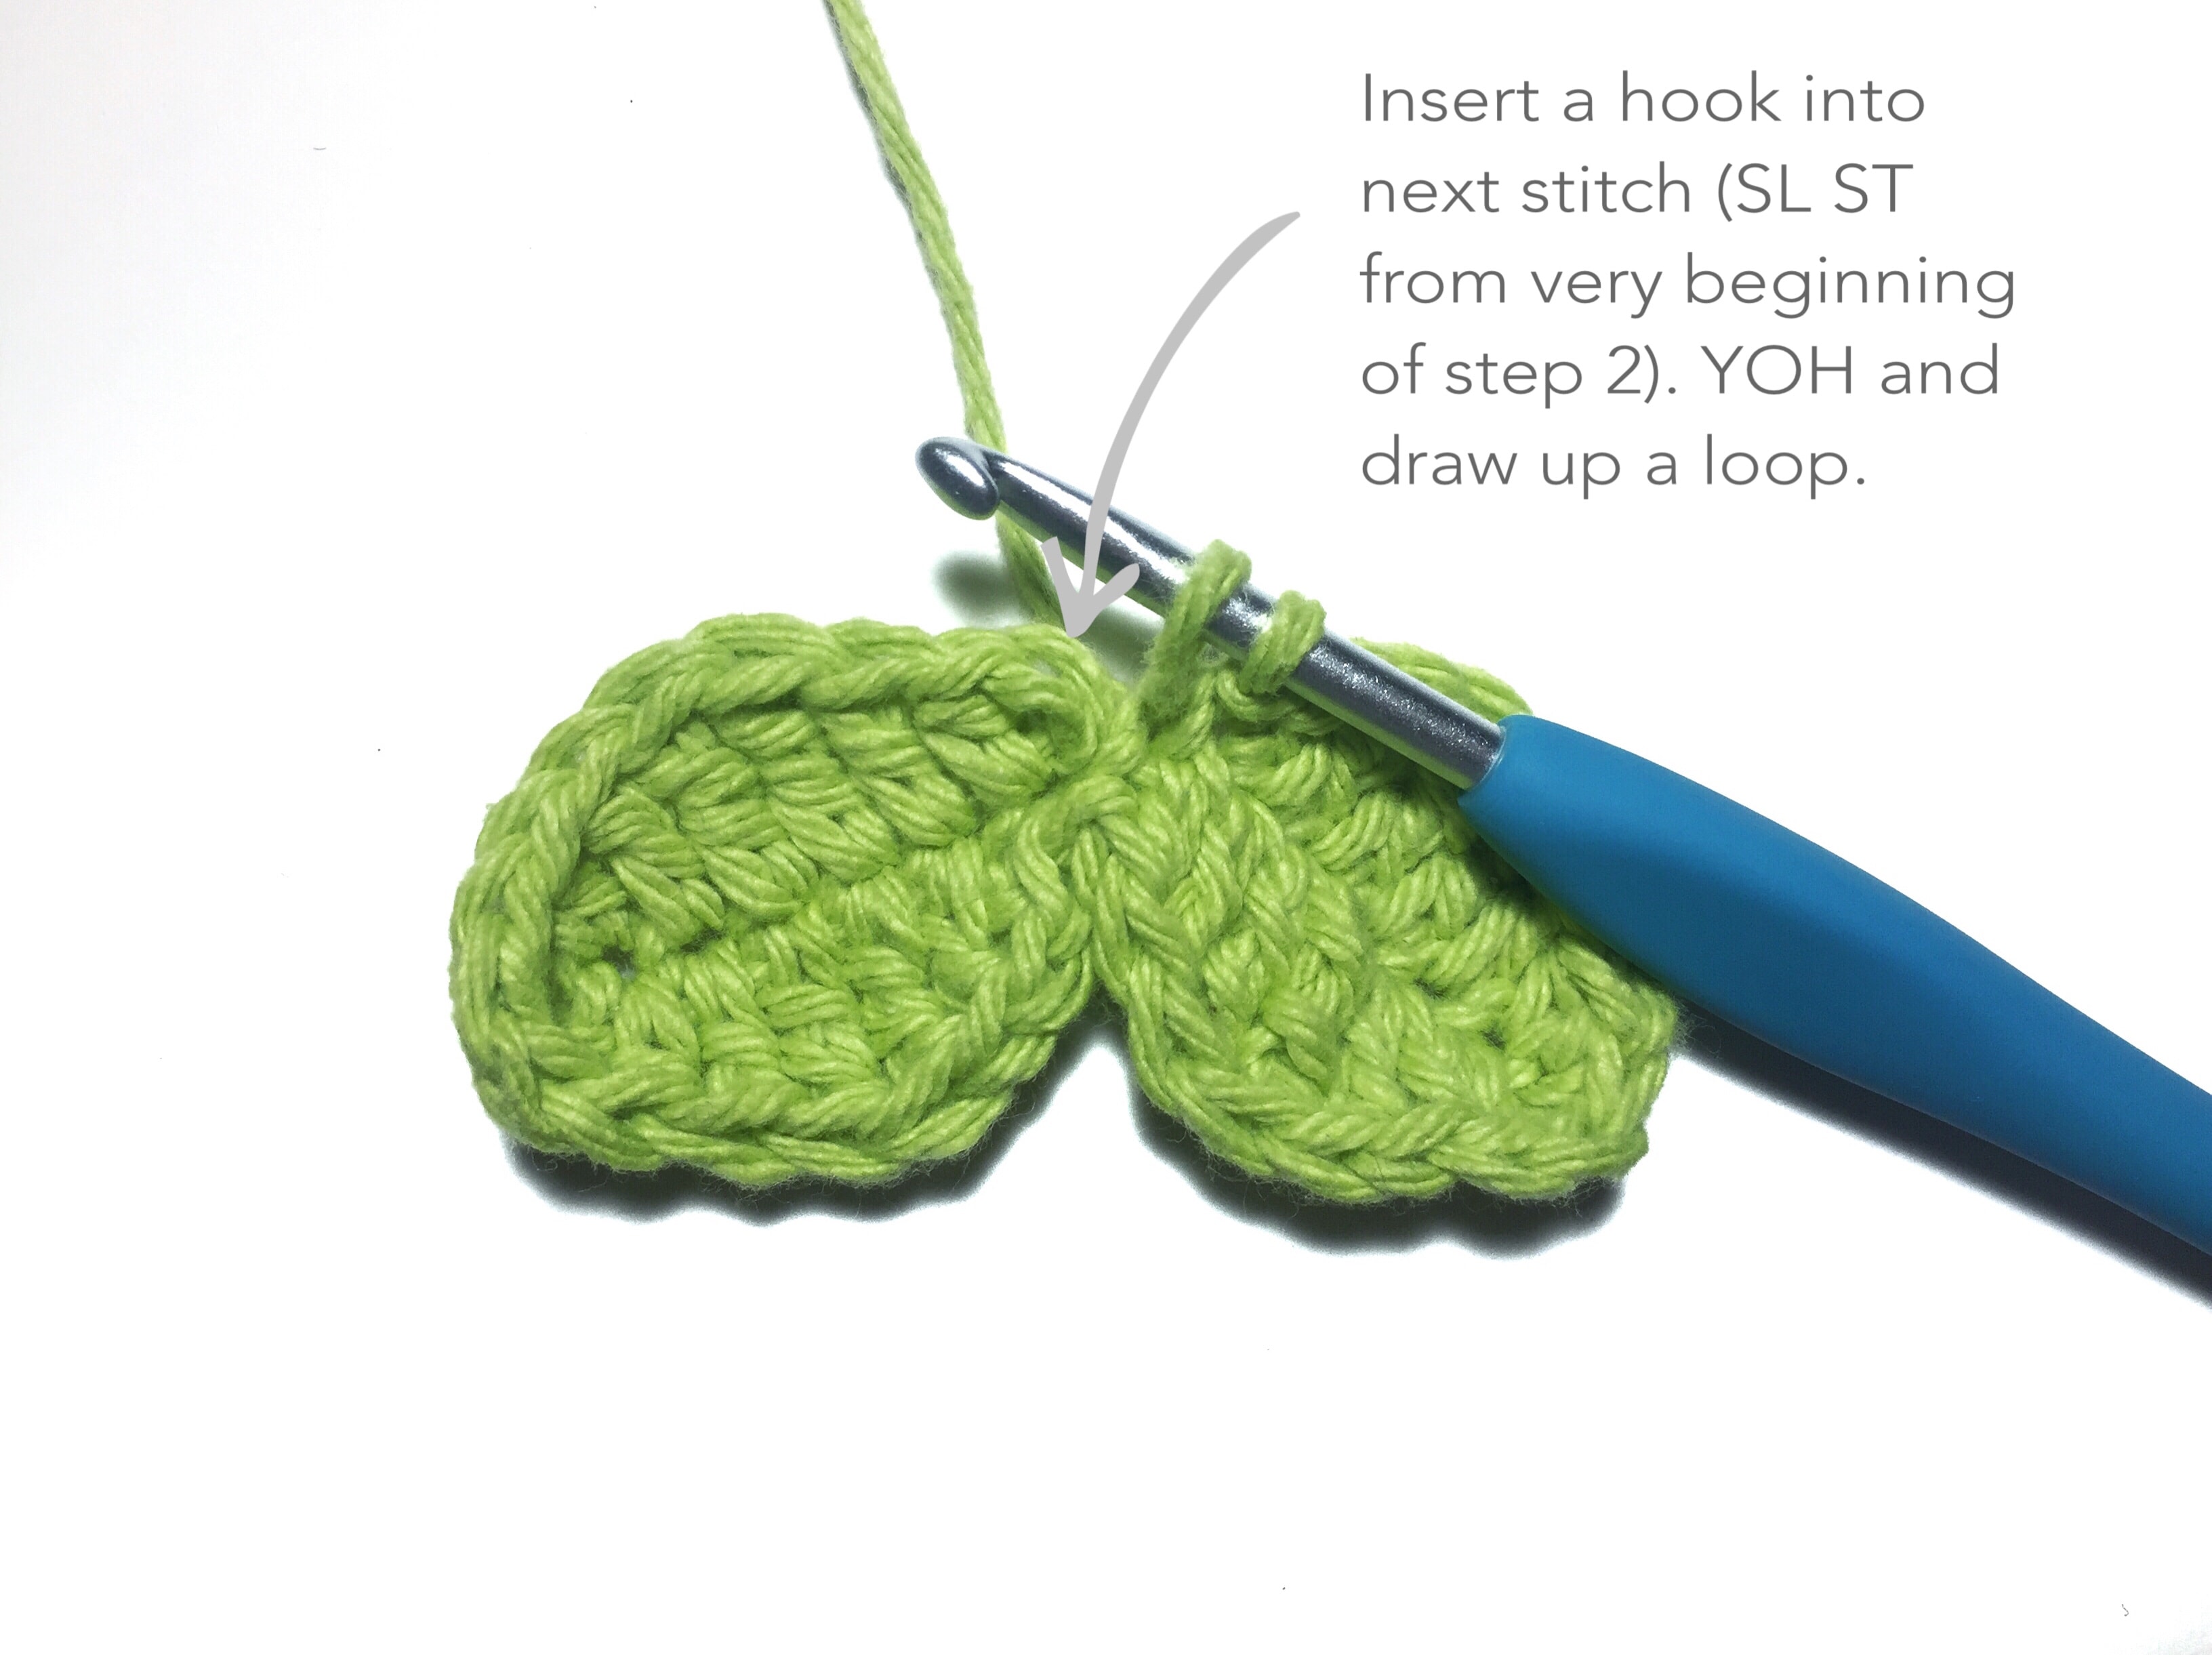
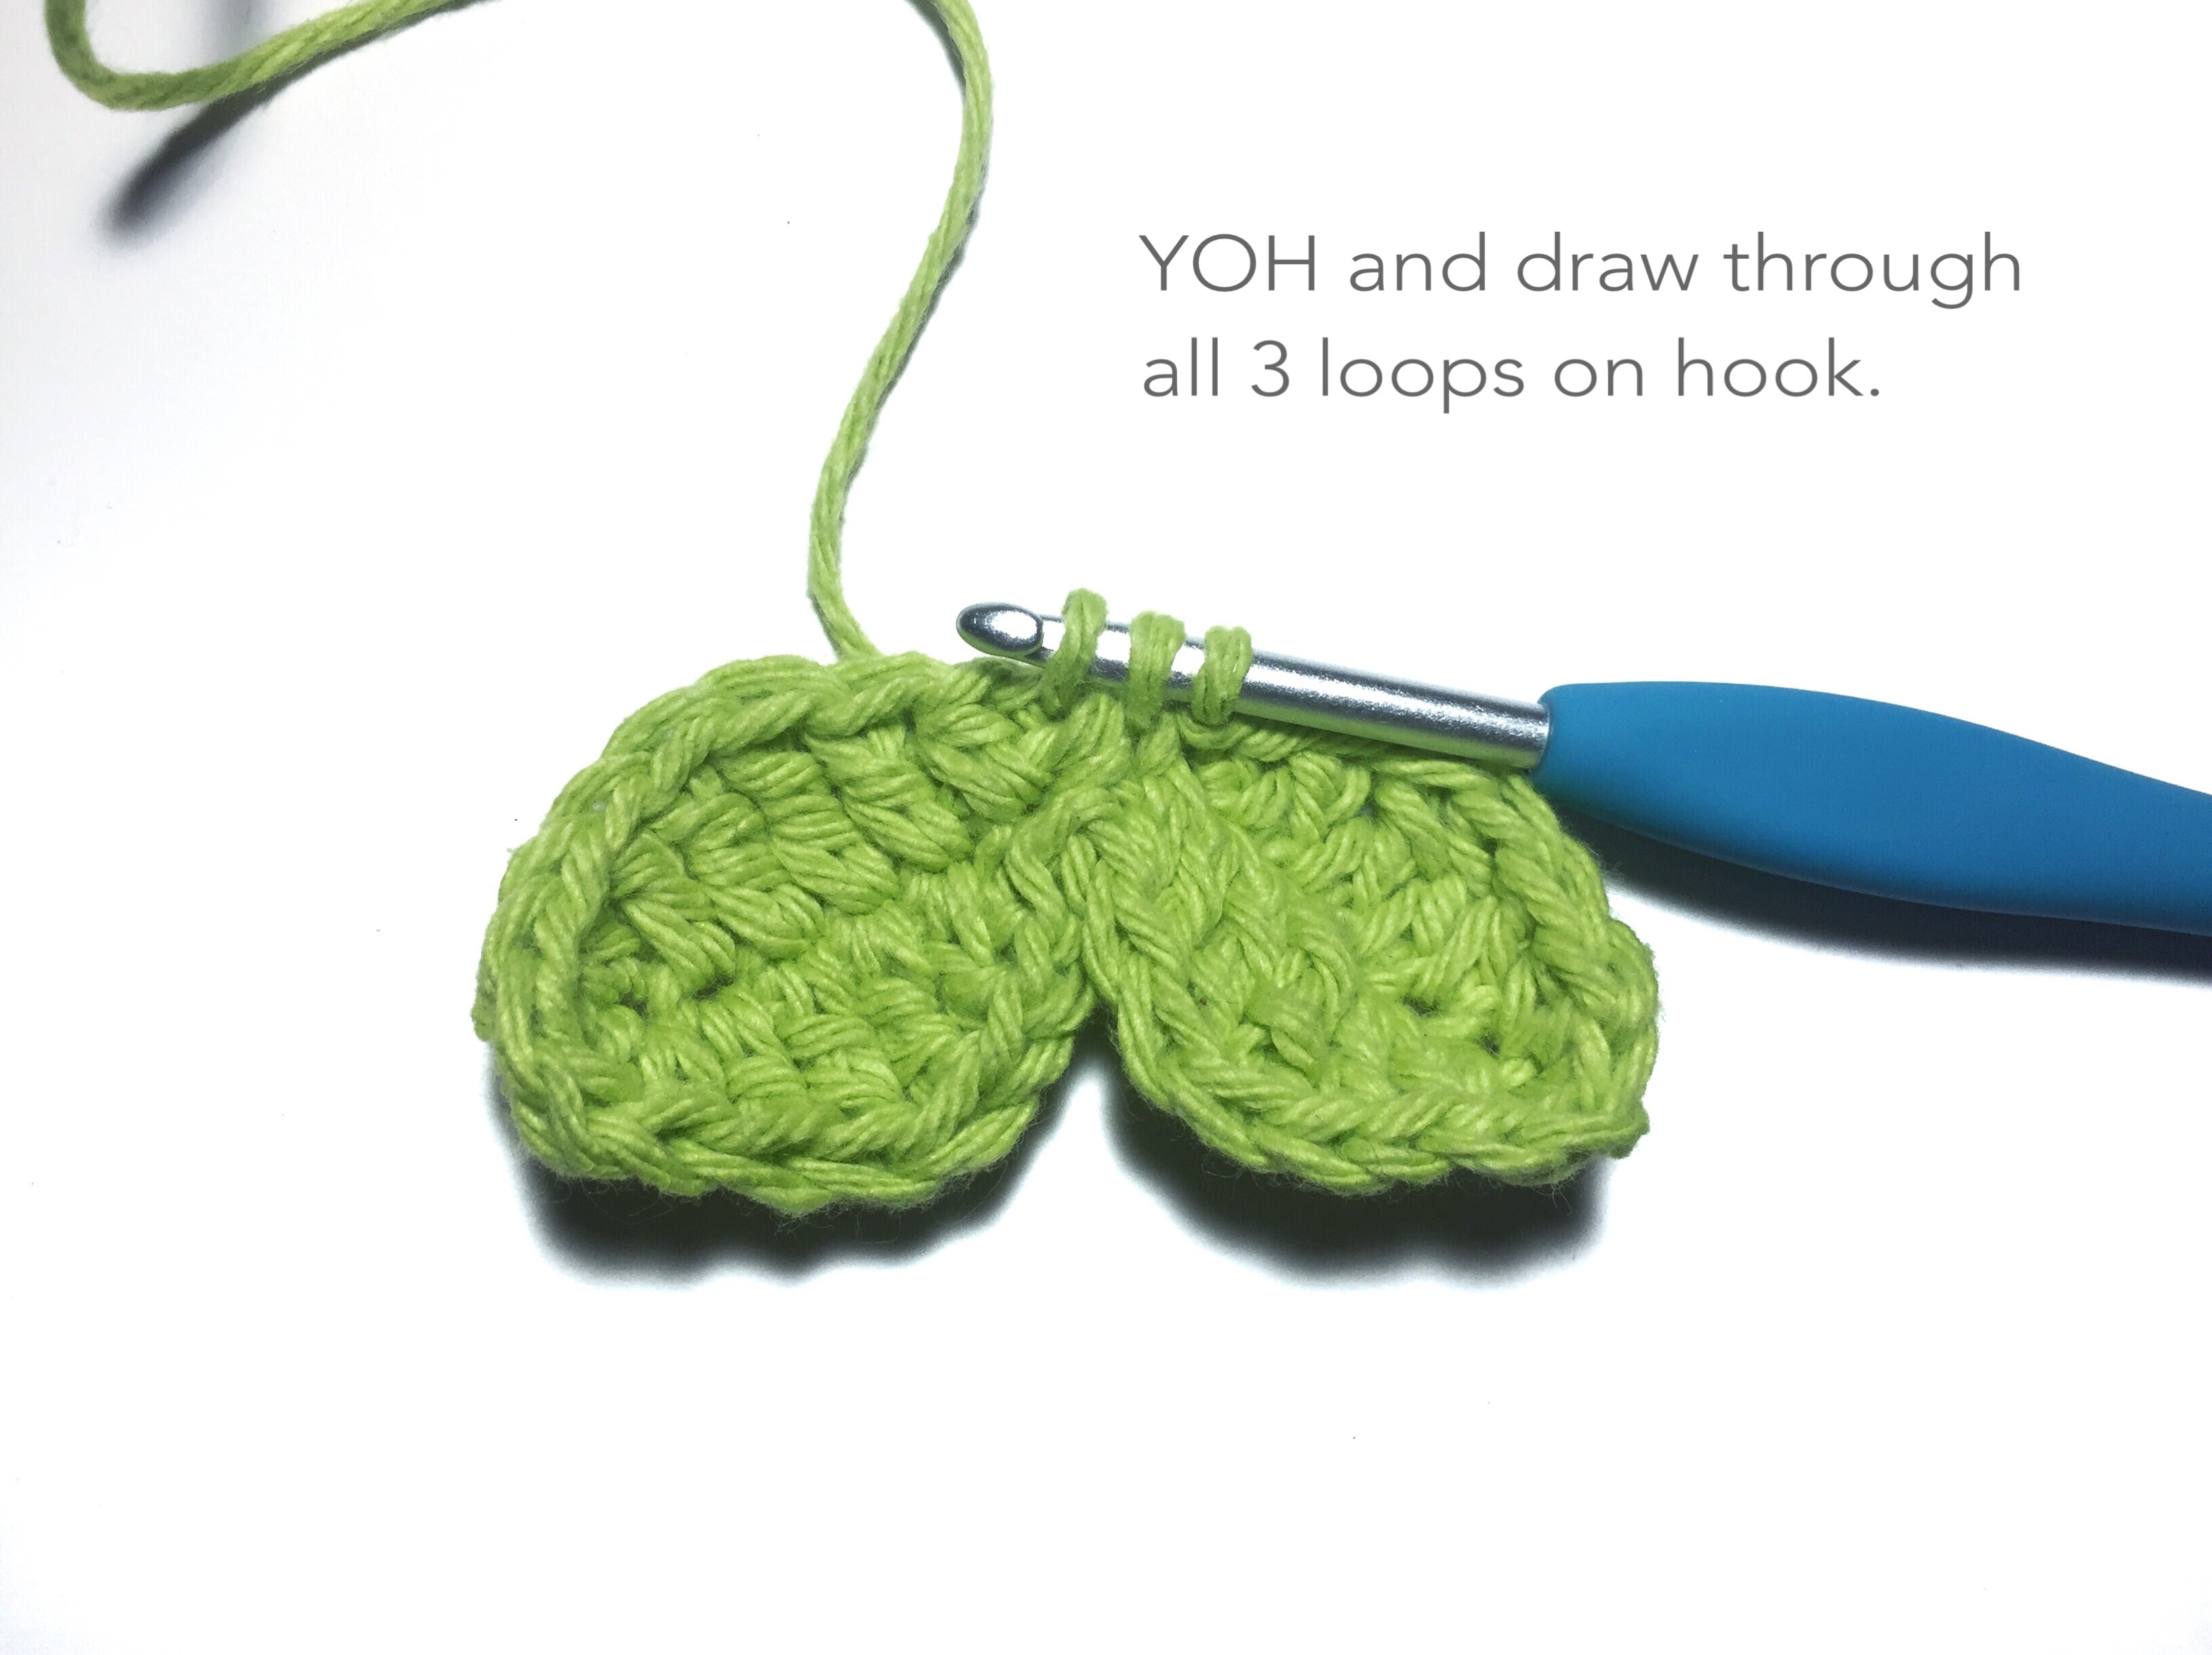
Step 4 – Insert a hook into next stitch (8th CH). YOH and draw up a loop. Insert a hook into next stitch (SL ST from very beginning of Step 2). YOH and draw up a loop. YOH and draw through all 3 loops on hook.
Step 5 – Pull a loop about 25″ long. Align the working yarn to 25″ as well then cut it. Weave in ends from Step 1 and the beginning of Step 2.

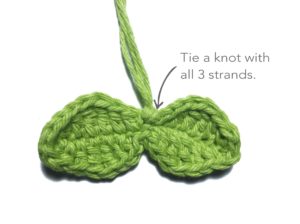
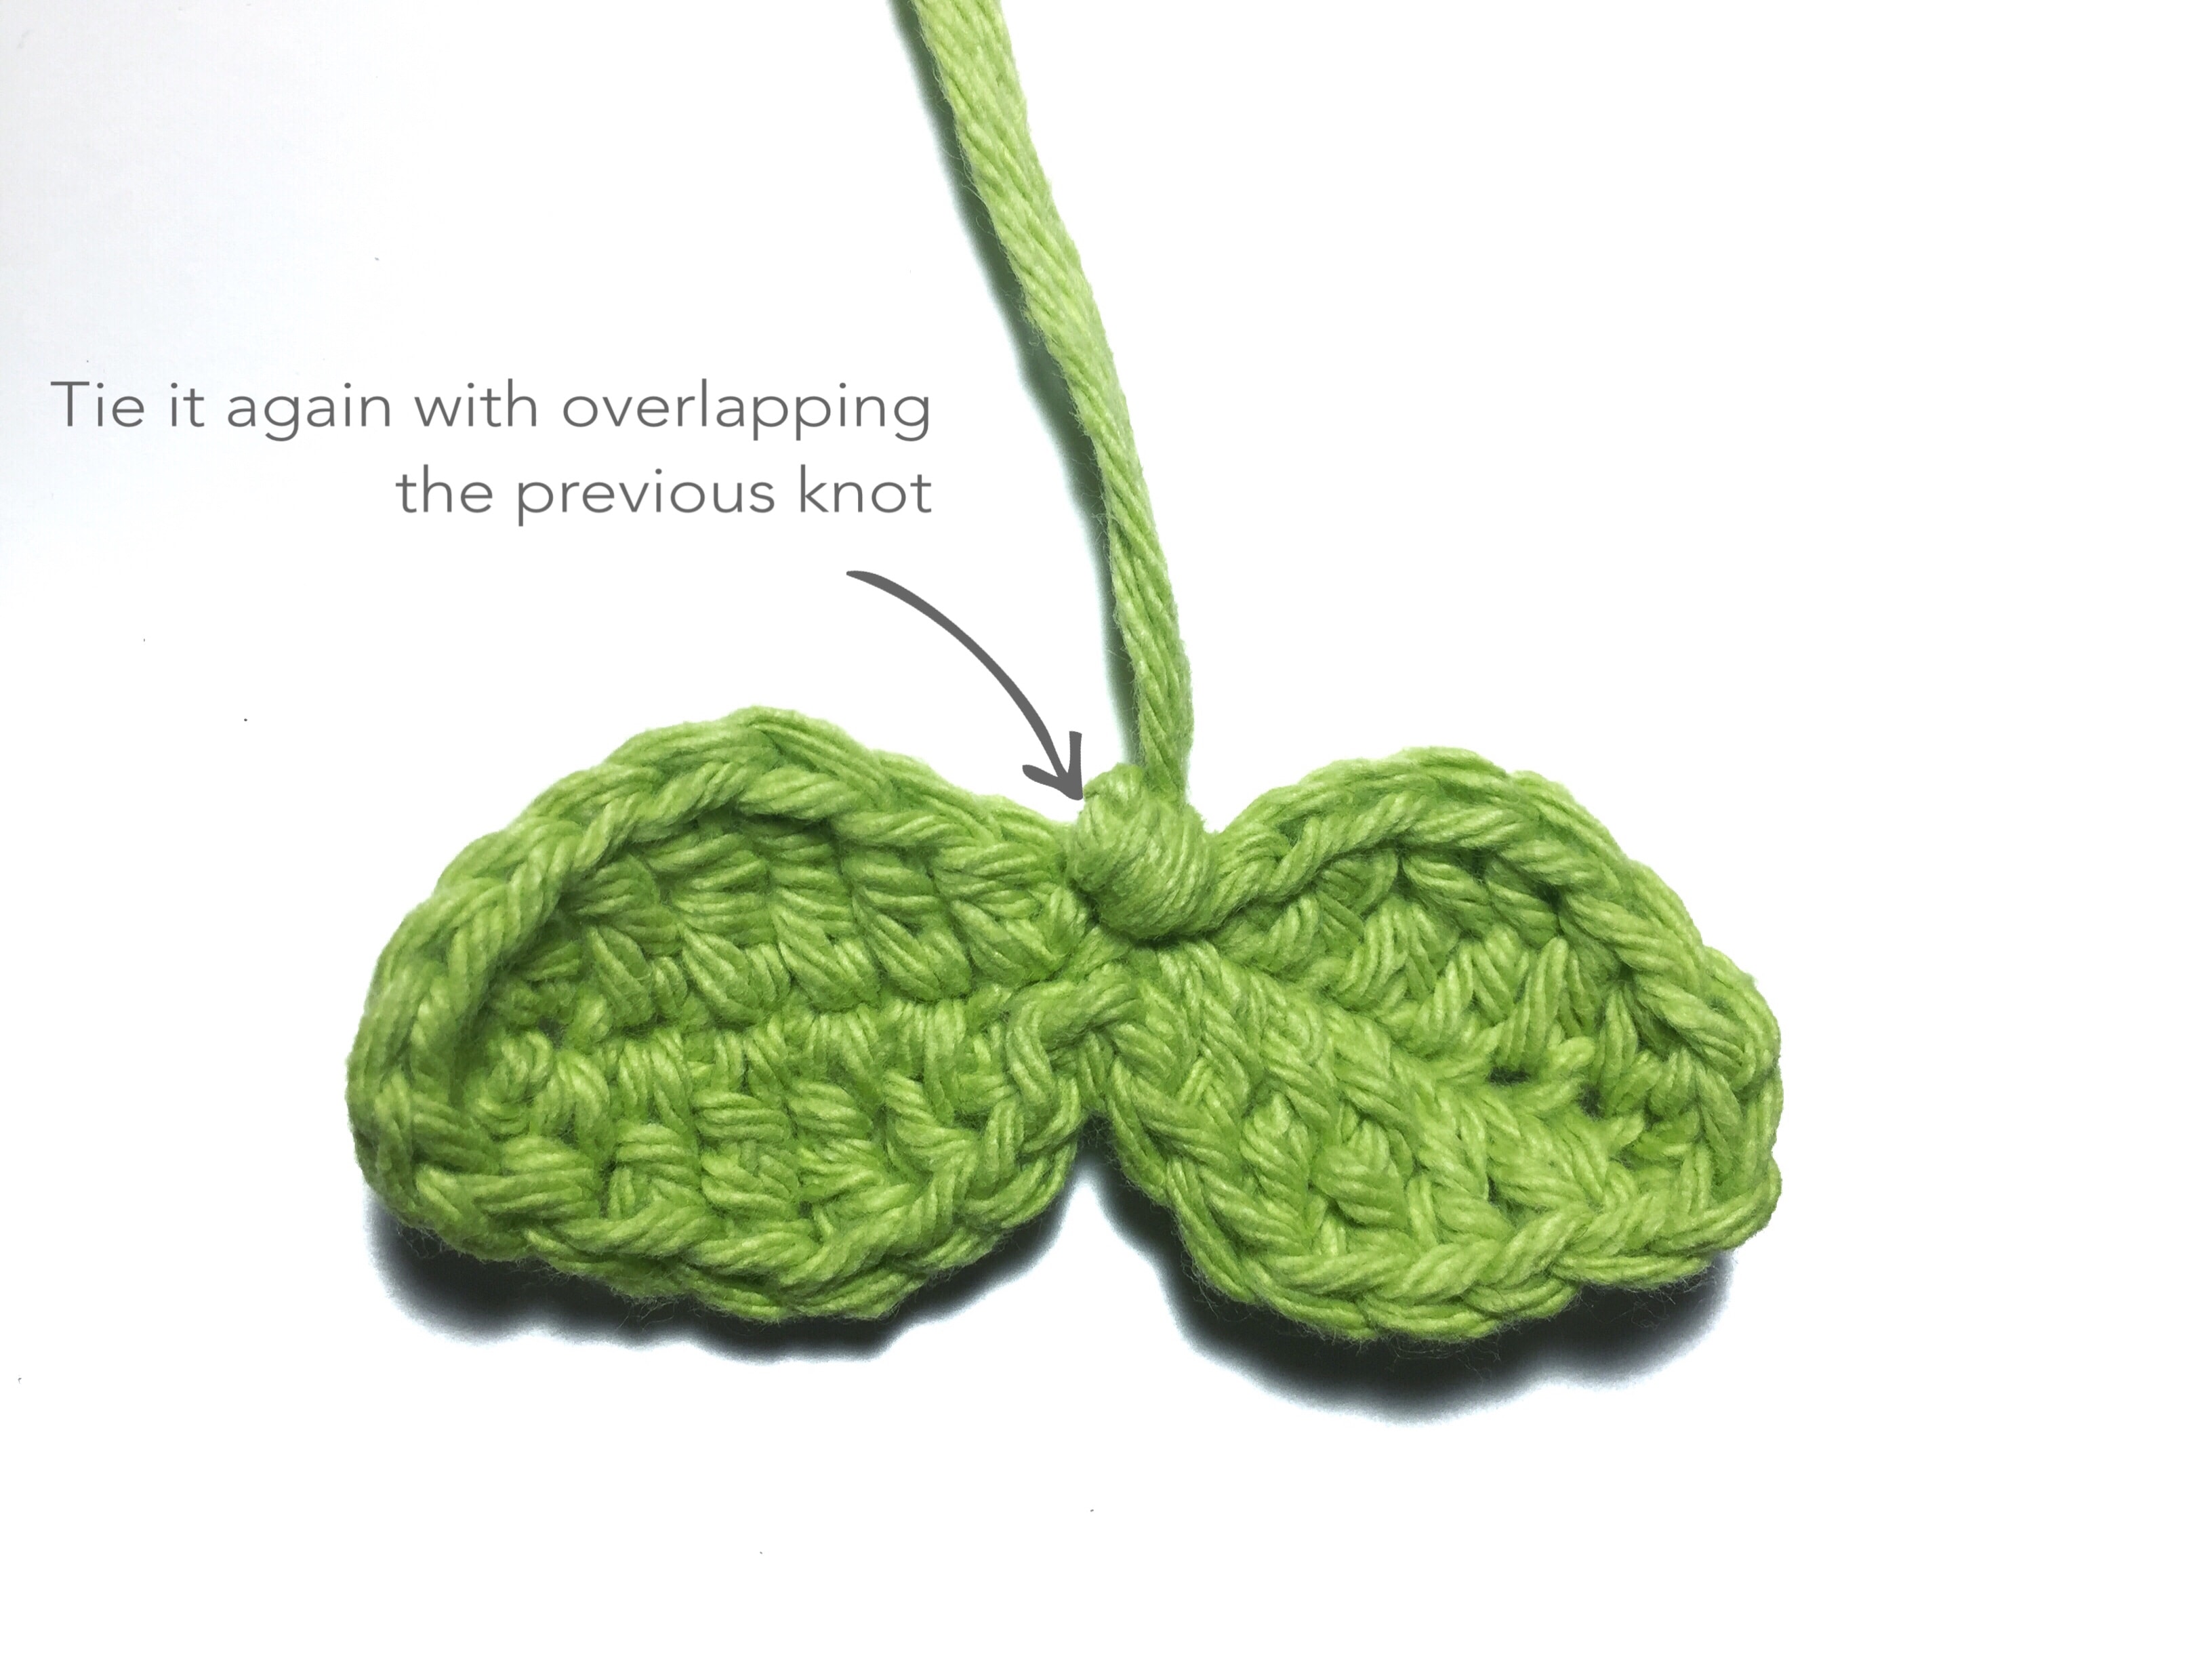
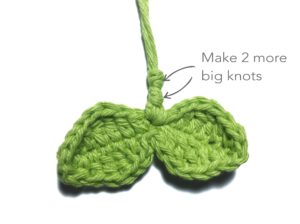
Step 6 – Tie a knot with all 3 strands. Tie it again as you overlap the previous knot. Make 2 more big knots.
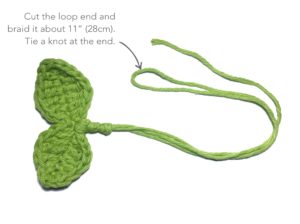
Step 7– Cut the loop end and braid it about 11″ (28cm) long. Tie a knot at the end.
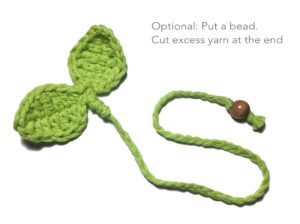
Step 8– (Optional) Put a bead then tie a knot. Cut excess yarn at the end of the knot.
If you have any bookworm friends, this would be such a cute gift!
Please let me know if you have any question with the pattern!
Thank you for reading and happy crocheting!
![[Free Crochet Pattern] Cute little leaves to guide your reading! Budding Leaf Bookmark by Tying An End](https://www.tyinganend.com/wp-content/uploads/2018/03/IMG_7157-435x1024.jpg)
This pattern is an original pattern by Tae of Tying An End. Please do not claim this pattern as your own. If you wish to share this pattern, please link to this pattern and do not copy and paste it on to your site. You may keep a copy for your own personal use but please do not sell the pattern or distribute it. Please see Disclosure & Terms of Use for more info.
![[How to Crochet] Invisible Join when you are working in round with multiple colors](https://www.tyinganend.com/wp-content/uploads/2018/02/IMG_6213.jpg)
23 Comments
KikkiS
Such a cute leaf bookmark and a super step by step instruction. This will be my indoor easter activity. Perfect way to get that spring feeling in the still snowy Nowegian mountains 🐥
Tae
Thank you so much! We all wish spring weather is here. Enjoy making it! 😊
Rebecca
Beautiful, simple design. I love that this can be a quick project with such a lovely result! Thanks so much for sharing this pattern!! I’m always in awe of makers who can create patterns and your picture instructions with arrows are the clearest descriptions of stitches and placement I’ve seen. Just lovely work.
Tae
Thank you so much Rebecca! This means so much to me!
I grew up making crochet items with chart instruction instead of written pattern, and I sometimes had hard time understanding which stitch goes where. Not everyone can understand by only written instructions, so I know photo instructions with clear description can help others!
Darlena Howey
Do you size this in any ( blocking)?
Tae
Hi Darlena, you can block it if you like, but I didn’t block it.
McKenna
hello! if i credit you may i sell these on etsy? i love the pattern and would love to make some but dont want to disrespect you!
Tae
Hi McKenna, I’m glad to hear you like my pattern! You are welcome to sell your finished items as long as you use your own photos and mention “Tying An End” with my blog link in the Etsy description for credit!
Kate
Wow, those are great detailed instructions. I knit & don’t know how to crochet but this gave me hope to try. Do you have a knitting pattern for this? Thanks!
Tae
Hello and thank you Kate! There are many beginner friendly patterns out there, and I hope you can give it a try someday 😉
Unfortunately, I do not have knitting version of this design.
Elise
Hi Tae! I love this pattern. Under the terms and conditions it said I could sell my work if I credit you as the designer. Would it be ok if I sold these bookmarks on my Etsy shop? I just wanted to make sure that it is ok with you first.
Tae
Hi Elise! Yes, you can sell this bookmark as long as you clearly state that it was designed by me, along with a link to my blog (www.tyinganend.com). I would appreciate even more if you can tell me the Etsy link once it’s listed up 🙂 Thank you for double checking!
Pingback:
beginner chrocheter
hi! I am a beginner to crocheting and was wondering if you could make a video of this?
Tae
Hi there, as of now I am not planning to make a video for any of my patterns because of time. I hope the photo tutorials can be helpful, and please let me know if you need help and I’ll do my best to help you out!
tammylouevans
This was an super simple and adorable quick project!! I’m a visual learner and I can’t thank you enough for the photos!!! Can’t wait to try more of ur designs. 💓
Tae
Hi Tammy, I’m so happy to hear that the photos helped!
Marit
Hi there! I’m a little confused whether this pattern is written in UK or US crochet terms? As far as I can find when translating to my own language, TR is a UK term while HDC is a US term. I’m a beginner and cannot seem to figure it out from the pictures yet. Could you help me with what stitches to use? Thank you!
Tae
Hi Marit,
All of my patterns are written in US crochet terms. Sorry about the confusion!
niicolee00
Hi Tae! Do you have an approximate size for the bead?
Tae
Hi Nicole, I don’t have the package so I don’t know exact size, but I have a leftover bead and it’s about 10mm!
Nicole
Thanks so much for checking and getting back to me!
Pingback: